

Summarize this article with:
Costco sells USDA Prime grade beef in their meat department. This is the highest quality designation from the USDA, typically reserved for high-end restaurants and steakhouses.
The prime grade means abundant marbling throughout the meat. That fat content translates directly to tenderness and flavor when cooked properly.
Most home cooks grab Costco prime beef for special occasions or weekend cookouts. The pricing sits significantly below restaurant costs while delivering the same quality cuts.
This guide covers three cooking methods: cast iron skillet, grill, and reverse sear. Times range from 10 minutes for stovetop steaks to 4 hours for a full roast. You will need a meat thermometer for accurate results.
Product Details
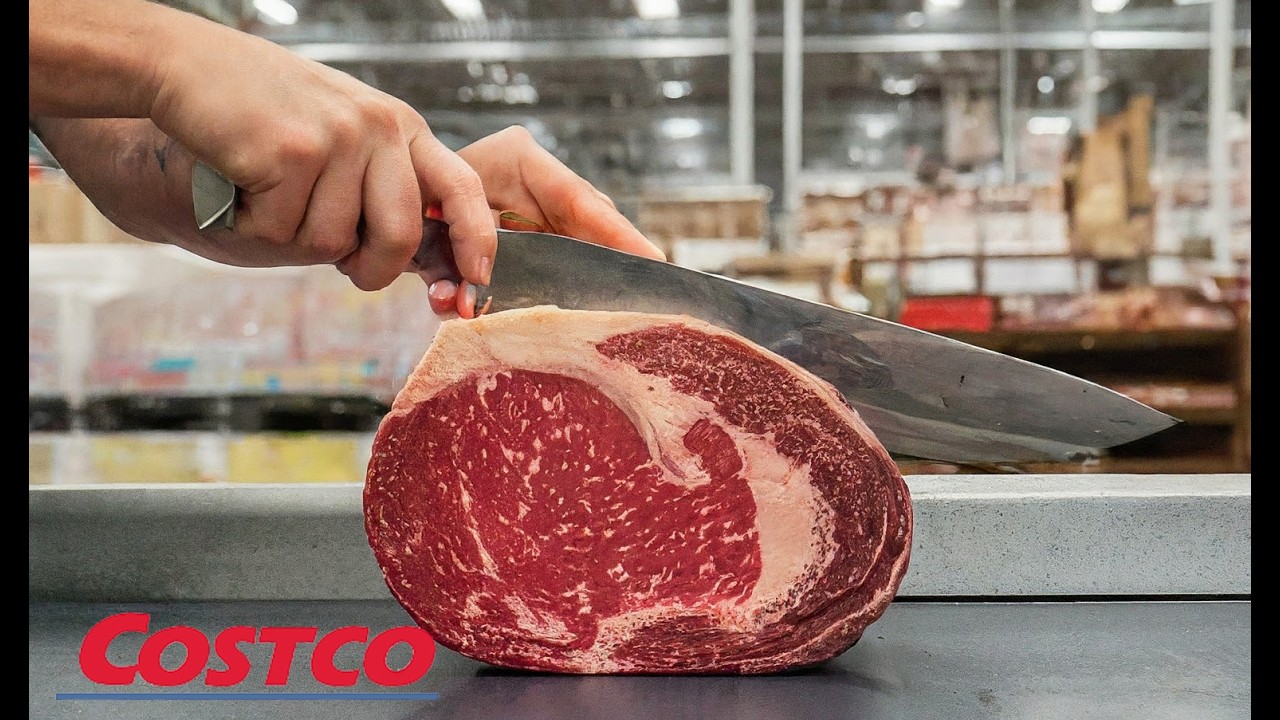
Product: Kirkland Signature USDA Prime Beef Ribeye
Type: Fresh, unfrozen cuts
Package Size: 3-5 pounds (varies by cut)
Price: $15.99 per pound for Prime Ribeye, $10.99 per pound for Choice (Updated January 2026)
Storage: Refrigerate at 40 degrees F or below. Freeze for longer storage.
Calories per Serving: Approximately 250-300 calories per 4-ounce serving
Main Ingredients: 100% beef
Item Number: Varies by cut and location
Cooking Methods Comparison
| Method | Time | Equipment | Result | Best For |
| Cast Iron Skillet | 8–12 min | Cast iron pan | Crispy crust, juicy center | Individual steaks, speed |
| Grill | 10–16 min | Gas or charcoal | Smoky flavor, char marks | Outdoor cooking, crowds |
| Reverse Sear | 2–4 hours | Oven + Cast iron | Edge-to-edge pink | Thick cuts, prime rib |
Recommended Method: Cast iron skillet for steaks under 1.5 inches thick. The high heat retention creates a caramelized crust that locks in the beef juices.
Method 1: Cast Iron Skillet (Recommended)
This stovetop method takes 8-12 minutes total. You will get a restaurant-quality sear with a pink, juicy interior. Works best for ribeye steaks, New York strips, and filet mignon cuts around 1 to 1.25 inches thick.
Step 1: How Do You Prepare the Steak?
Pull your prime beef from the refrigerator 30-45 minutes before cooking. Room temperature steak cooks more evenly than cold meat straight from the fridge.
Instructions:
- Pat the steak completely dry with paper towels on both sides
- Season generously with kosher salt and black pepper
Equipment: Paper towels, cutting board, kosher salt, black pepper
Step 2: What Temperature and Time Do You Use?
Your cast iron skillet needs to reach 450-500 degrees F before the steak goes in. This high heat creates the Maillard reaction that gives you that brown, flavorful crust.
Instructions:
- Heat cast iron over medium-high for 5-10 minutes until almost smoking
- Add 1 tablespoon of high smoke point oil (avocado or vegetable)
- Cook 3-4 minutes on the first side without moving
Temperature: 450-500 degrees F surface temperature
Time: 3-4 minutes per side for medium-rare on a 1-inch steak
Step 3: When Do You Flip the Steak?
Flip only once. The steak should release easily from the pan when ready. If it sticks, give it another 30 seconds.
Instructions:
- Flip at the 3-4 minute mark when a dark crust forms
- Add 2 tablespoons butter, crushed garlic, and fresh thyme or rosemary
- Tilt the pan and baste the steak with melted butter for 1-2 minutes
Checkpoint: At the 4-minute mark, check for golden-brown sear before flipping
Step 4: How Do You Know When It Is Done?
A meat thermometer takes the guesswork out. Insert it into the thickest part of the steak, avoiding any bone.
Instructions:
- Remove steak when internal temperature hits 125 degrees F for medium-rare
- The temperature will rise 5-10 degrees during resting (carryover cooking)
- Rest on a wire rack for 5-10 minutes before cutting
Target Temperature: 125 degrees F for medium-rare, 135 degrees F for medium
Visual Indicator: Deep brown crust with rendered fat cap and steam rising from the meat
Method 2: Grill
Grilling Costco prime beef steaks gives you smoky char and those classic crosshatch marks. This method works great for bone-in ribeyes, porterhouse, and T-bone steaks. Total time runs 10-16 minutes depending on thickness and your preferred doneness level.
Step 1: How Do You Prepare the Steak?
Take your thick cut steaks out of the fridge 30 minutes ahead. Trim any large fat chunks to prevent flare-ups on the grill.
Instructions:
- Trim excess edge fat but leave some for flavor
- Brush lightly with olive oil on both sides
- Season with coarse salt and freshly cracked pepper
Equipment: Grill brush, tongs, meat thermometer, paper towels
Step 2: What Temperature and Time Do You Use?
Preheat your grill to high heat. You want the grates screaming hot before the beef touches them.
Instructions:
- Preheat grill to 450-500 degrees F (medium-high on most gas grills)
- Clean grates with a grill brush
- Oil the grates with a folded paper towel dipped in vegetable oil
Temperature: 450-500 degrees F grill surface temperature
Time: 4-5 minutes per side for a 1-inch ribeye cooked to medium-rare
Step 3: When Do You Flip the Steak?
One flip. That is the rule. Moving the steak around prevents proper searing and those grill marks you want.
Instructions:
- Place steak on hot grates and close the lid
- Grill 4-5 minutes without moving
- Flip once and cook another 4-5 minutes for medium-rare
Checkpoint: At the 4-minute mark, check for defined grill marks before flipping
Step 4: How Do You Know When It Is Done?
Same as the skillet method. Temperature does not lie. Pull the steak 5-10 degrees before your target temp.
Instructions:
- Check internal temperature at the thickest part
- Remove at 130 degrees F for medium-rare final result
- Rest on a plate tented loosely with foil for 5-10 minutes
Target Temperature: 130 degrees F for medium-rare after resting
Visual Indicator: Charred exterior with grill marks, juices pooling on surface
Method 3: Reverse Sear (For Thick Cuts and Roasts)
The reverse sear method works best for steaks over 1.5 inches thick and for cooking a Costco standing rib roast. You cook low and slow first, then finish with a hard sear. This gives you edge-to-edge pink with zero gray bands.
Total time runs 2-4 hours depending on the size of your cut. But the results? Worth every minute.
Step 1: How Do You Prepare the Beef?
Season your prime rib roast or thick steak the night before if possible. This dry brining step pulls moisture to the surface and seasons the meat deeply.
Instructions:
- Pat the beef dry with paper towels
- Season liberally with kosher salt (about 1 tablespoon per 2 pounds)
- Refrigerate uncovered for 12-24 hours on a wire rack
- Remove from fridge 2 hours before cooking to reach room temperature
Equipment: Wire rack, sheet pan, meat thermometer with probe, cast iron skillet
Step 2: What Temperature and Time Do You Use?
Low oven temperature first. This slowly brings the internal temp up without overcooking the exterior.
Instructions:
- Preheat oven to 250 degrees F
- Place beef on a wire rack set over a sheet pan
- Insert probe thermometer into the thickest part
- Roast until internal temperature reaches 115-120 degrees F
Temperature: 250 degrees F oven temperature
Time: Approximately 3-4 hours for a 5-pound prime rib, or about 45 minutes per pound
Step 3: When Do You Rest and Sear?
After the slow roast phase, you rest the meat while getting your searing surface blazing hot. This rest period lets the internal temperature even out.
Instructions:
- Remove beef from oven at 115-120 degrees F internal temp
- Rest loosely tented with foil for 20-30 minutes
- Heat cast iron skillet over high heat until almost smoking, or crank oven to 500 degrees F
Checkpoint: Internal temp should stabilize around 120-125 degrees F during rest
Step 4: How Do You Know When It Is Done?
The final sear takes just 1-2 minutes per side. You are only building crust at this point, not cooking the interior further.
Instructions:
- Sear in hot cast iron for 45-90 seconds per side
- Or blast in 500 degree F oven for 6-10 minutes until browned
- No additional rest needed after reverse sear
Target Temperature: 130-135 degrees F final internal temp for medium-rare
Visual Indicator: Deep golden-brown crust with even pink interior from edge to edge
Safety and Quality Indicators
Food Safety
- Internal Temperature: Beef steaks are safe at 145 degrees F minimum, though many prefer medium-rare at 130-135 degrees F
- Surface Searing: High heat searing kills surface bacteria on whole muscle cuts
- Thawing: Always thaw frozen beef in the refrigerator, never at room temperature
Quality Indicators (Done Properly)
- Color: Deep brown caramelized crust on exterior, pink to red interior
- Texture: Tender with slight resistance when pressed, juicy when cut
- Temperature: Hot throughout with juices running from the cut surface
- Appearance: Rendered fat cap, no raw or gray sections
Signs of Overcooking
- Gray interior with no pink remaining
- Dry, tough texture that requires heavy chewing
- Shrunken steak that has lost significant volume
- No juice release when cut
Serving Suggestions
Portion Size: 8-12 ounces per person for bone-in cuts, 6-8 ounces boneless
Serving Ideas
- Slice against the grain and fan on a warm plate with compound butter melting on top
- Serve whole steak with a side of horseradish cream sauce
- Pair with Costco mashed potatoes for a classic steakhouse meal
Pairing Recommendations
- Roasted asparagus or Costco frozen vegetables cooked until crisp-tender
- Creamed spinach or sauteed mushrooms
- Full-bodied red wine like Cabernet Sauvignon or Malbec
- Costco jasmine rice or baked potato
Storage and Reheating
Leftover Storage
- Refrigerate within 2 hours of cooking
- Store in an airtight container or wrapped tightly in plastic wrap
- Consume within 3-4 days
Reheating Instructions
- Oven: 250 degrees F for 15-20 minutes until warmed through
- Stovetop: Medium heat in a skillet with butter for 5 minutes
- Target Temperature: 110-120 degrees F internal (do not exceed original doneness)
Slice cold leftover steak thin for sandwiches or salads if you want to avoid reheating altogether.
Troubleshooting Common Issues
Issue: Steak has a gray band around the pink center
Cause: Pan or grill was not hot enough, or steak was too cold when cooking started
Solution: Make sure your cooking surface is screaming hot (almost smoking). Let steak reach room temperature for 30-45 minutes before cooking.
Issue: Steak is tough and chewy
Cause: Overcooked beyond medium, or cut against the grain incorrectly
Solution: Use a meat thermometer and pull steak 5-10 degrees before target temp. Always slice against the grain of the muscle fibers.
Issue: No crust forms on the exterior
Cause: Too much moisture on the steak surface, or heat was not high enough
Solution: Pat steak very dry before seasoning. Make sure the pan is smoking hot before adding the beef. Do not crowd the pan.
Issue: Steak sticks to the pan or grill
Cause: Moved too early before crust formed, or cooking surface not properly oiled
Solution: Wait for the steak to release naturally. Oil the grates or pan before heating. If it sticks, give it another 30 seconds.
Product Variations and Related Items
Similar Costco Beef Products
- Ribeye cap steaks (spinalis) are considered the most tender, flavorful portion of the ribeye
- Costco filet mignon offers a leaner, extremely tender cut with less marbling
- Costco tri tip provides a more affordable option that still cooks up tender
- Costco top sirloin is a leaner alternative at a lower price point
- Costco short ribs work great for braising or slow cooking methods
- Costco brisket is ideal for smoking or slow roasting over several hours
Cooking Time Adjustments
Bone-in cuts take 2-3 minutes longer per side than boneless. The bone acts as an insulator and slows heat transfer to the center of the steak.
Thicker steaks over 1.5 inches should use the reverse sear method rather than direct high-heat cooking. Otherwise, you will burn the outside before the middle cooks through.
Which Method Should You Choose?
Choose Cast Iron Skillet When:
- Your steak is 1 to 1.5 inches thick
- You want the fastest cooking time (8-12 minutes)
- You prefer butter basting for added richness
- Cooking indoors is required
Choose Grill When:
- You want smoky, charred flavor
- Cooking for a group (multiple steaks at once)
- Weather permits outdoor cooking
- You prefer the look of grill marks
Choose Reverse Sear When:
- Your cut is over 1.5 inches thick
- Cooking a full prime rib roast
- You want perfect edge-to-edge doneness
- Time is not a constraint (2-4 hours total)
Time Comparison
Cast Iron (8-12 min) is faster than Grill (10-16 min), which is much faster than Reverse Sear (2-4 hours)
Texture Results
Reverse Sear gives the most even doneness. Cast Iron creates the best crust. Grill adds the most flavor complexity.
FAQ on How To Cook Costco Prime Beef
What temperature should I cook Costco prime beef to for medium-rare?
For medium-rare prime ribeye or New York strip, pull the steak at 125-130 degrees F internal temperature.
Use a meat thermometer inserted into the thickest part. The temp rises 5-10 degrees during resting from carryover cooking.
How long should I let prime beef rest before cutting?
Rest your Costco prime steak for 5-10 minutes after cooking. This allows juices to redistribute throughout the meat.
Skip this step and those flavorful juices end up on your plate instead of in the beef.
Should I bring Costco prime beef to room temperature before cooking?
Yes. Let your steak sit out for 30-45 minutes before cooking.
Room temperature steak cooks more evenly and develops better crust. Cold meat straight from the fridge leads to gray bands around the pink center.
What is the best cooking method for thick cut prime ribeye?
The reverse sear method works best for steaks over 1.5 inches thick. Cook low at 250 degrees F until 115 degrees F internal, rest, then sear in a screaming hot cast iron skillet.
How do I get a caramelized crust on my prime steak?
Pat the beef completely dry before seasoning. Heat your cast iron to 450-500 degrees F until almost smoking.
High heat triggers the Maillard reaction that creates that golden-brown, flavorful exterior.
Is Costco USDA Prime beef worth the extra cost over Choice grade?
Prime grade has more marbling fat content than Choice, which means more tenderness and flavor. The difference is most noticeable in ribeye steaks.
For leaner cuts like filet mignon, the gap narrows considerably.
Can I freeze Costco prime beef without ruining the quality?
Yes. Wrap tightly in plastic, then foil, and freeze for up to 3-4 months.
Thaw slowly in the refrigerator for 24-48 hours. Never thaw at room temperature or in warm water.
What seasoning works best for Kirkland Signature prime beef?
Keep it simple. Kosher salt and freshly cracked black pepper are all you need.
Quality prime grade beef has enough flavor from the marbling. Season generously 45 minutes before cooking or right before it hits the heat.
How do I know when my Costco prime steak is done without cutting it?
A digital meat thermometer is the only reliable method. Insert into the thickest part away from bone.
Target 125 degrees F for medium-rare, 135 degrees F for medium, 145 degrees F for medium-well.
Should I use butter or oil when cooking prime beef in a cast iron skillet?
Start with high smoke point oil like avocado or vegetable for the initial sear.
Add butter for basting after flipping. Butter burns at high searing temperatures but adds rich flavor during the finishing stage.
Conclusion
Learning how to cook Costco prime beef comes down to a few basics. High heat for searing. A reliable meat thermometer for doneness. Proper resting time before slicing.
Whether you choose the cast iron skillet method for weeknight ribeyes or the reverse sear technique for a holiday prime rib roast, the results beat most steakhouse meals.
The beef quality grades at Costco deliver serious value. Season simply with kosher salt and pepper, nail your internal temperature, and let the marbling do the rest.


