

Summarize this article with:
Most sushi rice fails before the vinegar even comes out.
The wrong rice variety, too much water, skipping the soak. These are the mistakes that turn a promising batch of short-grain Japanese rice into a sticky, gluey mess that falls apart the moment you try to roll it.
Learning how to make sushi rice in a rice cooker the right way comes down to a few non-negotiable steps, and this guide covers all of them.
You will learn the correct rice-to-water ratio for a rice cooker, how to make the vinegar seasoning (awasezu), the folding technique that gives sushi rice its glossy finish, and the most common mistakes that ruin the texture.
What Is Sushi Rice
Sushi rice, known in Japanese as shari, is not a rice variety. It is a preparation. Short-grain Japanese rice cooked and then seasoned with a mixture of rice vinegar, sugar, and salt.
Most people learning how to make sushi at home get this wrong from the start. They grab whatever rice is in the pantry, cook it, and wonder why it falls apart.
The distinction matters a lot. You need the right rice first, then the right technique. Both have to work together or the final texture will be off.
Why the Seasoning Defines Sushi Rice
Plain cooked short-grain rice is not sushi rice. The vinegar seasoning, called awasezu, is what transforms it.
The acetic acid in rice vinegar affects starch behavior at a structural level. Research published in Food Research International found that acetic acid changes the gelatinization and pasting properties of rice starch during cooking, which directly affects how the grains bind and hold their shape.
Sugar balances the sharpness of the vinegar. Salt brings the flavors together. Skip any of the three and the rice will taste flat or too sour.
Common Misconceptions
A lot of stores sell bags labeled “sushi rice.” That label refers to the grain variety, not a pre-seasoned product. You still have to season it yourself.
- Jasmine rice will not work. Too low in amylopectin starch content.
- Basmati will not work. Same problem, plus the grain is too long and dry.
- Brown rice produces a noticeably different texture and does not absorb the vinegar seasoning the same way.
The global sushi rice market was projected to reach approximately $1.5 billion by 2025, growing at a CAGR of 6.5% through 2033, driven largely by rising home cooking demand for authentic Japanese ingredients (Market Report Analytics, 2024).
—
What Rice to Use for Sushi Rice

Short-grain Japanese rice. That is the answer. Specifically, Japonica varieties.
The grain shape and starch composition are what matter here. Short-grain rice contains roughly 80% amylopectin, the branched starch molecule responsible for the sticky, cohesive texture sushi rice needs (Springer Nature, 2024).
Long-grain rice has about 22% amylose. That is the straight-chain starch that keeps grains separate and fluffy. Great for a pilaf. Bad for sushi.
Best Rice Varieties for Sushi
| Variety | Origin | Notes |
| Koshihikari | Japan / California | The Gold Standard. Prized for its perfect balance of aroma, stickiness, and gloss. |
| Hitomebore | Japan | The Smooth Alternative. Slightly softer and less sticky than Koshihikari; stays moist longer. |
| Calrose | California (USA) | The Global Workhorse. A medium-grain hybrid. Reliable and affordable for home use. |
| Nishiki | California (USA) | The Standard Entry. A popular medium-grain found in most Western supermarkets. |
| Tamaki Gold | California (USA) | The Premium Choice. A California-grown Koshihikari that rivals Japanese imports. |
Nishiki and Kokuho Rose are the most accessible options in North America. They cook well and absorb the vinegar seasoning properly. Tamaki Gold is worth the extra cost if you are making sushi for guests.
What to Avoid
Avoid any long-grain variety. That covers jasmine, basmati, and regular American long-grain rice. The starch composition is wrong for this application.
Also skip parboiled rice (like Uncle Ben’s). The parboiling process changes the starch structure in a way that prevents the rice from achieving the right sticky consistency.
In March 2024, Nishiki announced a new premium Koshihikari variety specifically cultivated for sushi preparation, targeting both foodservice and retail markets.
—
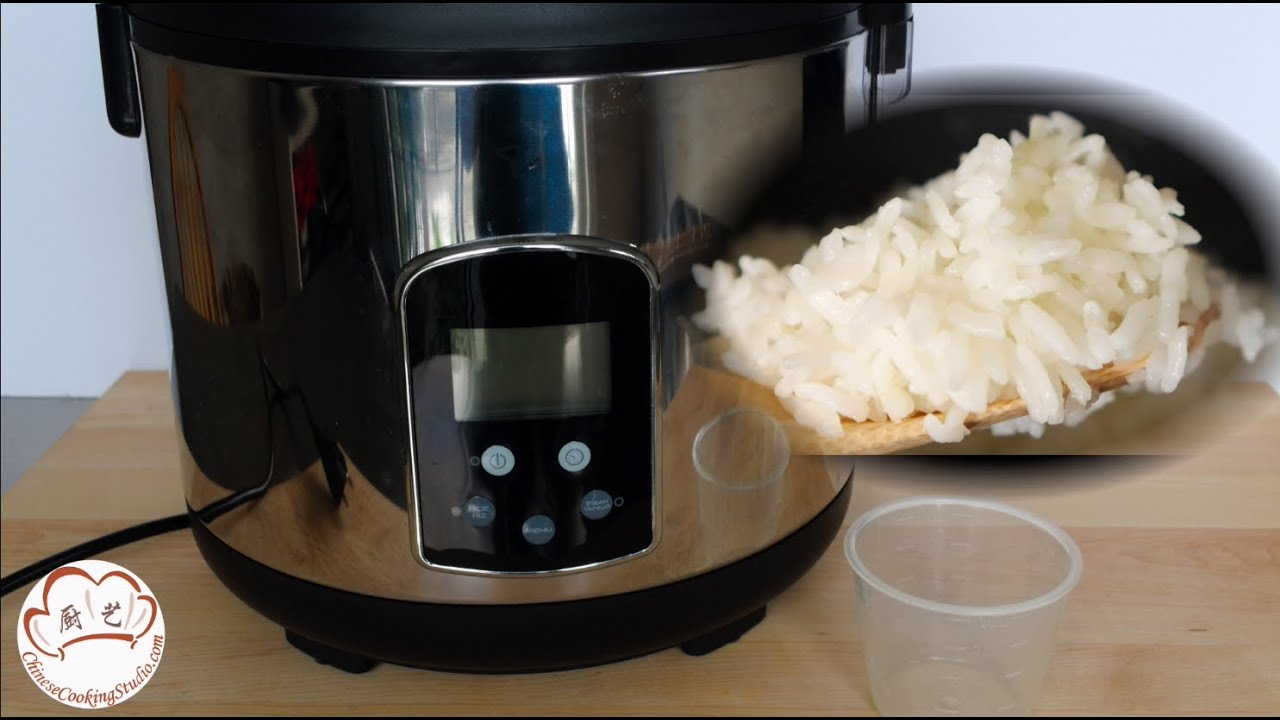
Sushi Rice Ratio for Rice Cooker
The standard ratio is 1 cup of short-grain rice to 1 cup of water when using a rice cooker. That is slightly less water than most stovetop recipes call for.
Why less? A rice cooker traps steam inside a sealed environment. That steam contributes to cooking in a way an open pot does not. Add too much water and the rice comes out mushy, which kills the texture.
Soaking Time Before Cooking
Soak the rice for 30 minutes minimum before cooking. Cold water, fully submerged.
Soaking allows water to penetrate the grain evenly before heat is applied. The result is a more consistent texture throughout each grain rather than a cooked exterior with a slightly hard center.
- Soak 30 minutes for standard results
- Up to 60 minutes in warm months when the rice feels particularly dry
- Drain completely after soaking before adding your measured cooking water
That last point trips people up. If you soak and then add water without draining first, you have no idea how much water is actually in the pot. The ratio is off from the start.
Adjusting for Your Rice Cooker Model
Basic rice cookers and high-end fuzzy logic models behave differently.
A Zojirushi with fuzzy logic technology uses sensors and microprocessors to adjust cooking time and temperature automatically. These machines tend to produce consistent results with the 1:1 ratio. A basic model from a budget brand may need a small adjustment, around 1 to 2 tablespoons of extra water, depending on how tightly the lid seals.
Start with 1:1. After cooking, if the rice feels slightly dry or individual grains seem a bit firm at the center, add 2 tablespoons more water on your next batch. If the rice is too wet and the grains are breaking down, reduce by 2 tablespoons.
| Rice Cooker Type | Water Ratio (Rice:Water) | Notes |
| Basic / Standard | 1:1 to 1:1.1 | Simple “on/off” heat; may lose steam, requiring a slightly higher ratio. |
| Zojirushi Fuzzy Logic | 1:1 | High precision. Use the “White Rice” or “Sushi” setting for a firmer grain. |
| Cuckoo Pressure | Slightly under 1:1 | Pressure forces moisture into the core; start at 1:0.9 to avoid mushiness. |
—
Sushi Vinegar Seasoning Recipe

The seasoning mixture is called awasezu. Three ingredients: rice vinegar, sugar, salt. The ratio matters more than people expect.
For every 2 cups of dry rice (uncooked), use 4 tablespoons rice vinegar, 2 tablespoons sugar, 1 teaspoon salt. That is the standard baseline. Some Japanese home cooks reduce the sugar slightly. Some add a small strip of kombu to the vinegar before heating it. Both are valid adjustments.
Rice Vinegar vs. Other Vinegars
Use rice vinegar. Not white vinegar. Not apple cider vinegar.
Rice vinegar has a mild acidity and a subtle sweetness that complements the rice without overpowering it. White vinegar is too sharp. Apple cider vinegar adds a fruity note that clashes with the clean flavor of sushi rice.
A study on sushi rice texture found that different vinegar types produce significantly different results in grain adhesiveness and hardness. Red wine vinegar and white vinegar both showed lower adhesiveness compared to rice vinegar when used in sushi seasoning (IFIS, 2022).
Pre-Mixed Sushi Vinegar
Brands like Mizkan and Marukan sell pre-mixed seasoned rice vinegar. The ratio is already balanced. Convenient for weeknight cooking.
The trade-off is that you lose control over sweetness and salt levels. If you are making sushi rice regularly and want to dial in the flavor to your taste, making your own mixture is the better approach. If you just need it to work without thinking, the pre-mixed versions are fine.
- Mizkan Seasoned Rice Vinegar: reliable, mild flavor
- Marukan Genuine Brewed Rice Vinegar: slightly less sweet, cleaner taste
—
Step-by-Step: Cooking Sushi Rice in a Rice Cooker

The global electric rice cooker market reached $4.4 billion in 2024 (IMARC Group), driven partly by growing home demand for Asian cooking. A lot of those purchases are from people who want to cook Japanese rice properly at home.
Here is exactly how to do it.
Rinsing, Soaking, and Cooking
Step 1: Rinse until the water runs clear.
Place the rice in a fine-mesh strainer or directly in the inner pot of your rice cooker. Add cold water, swirl, and drain. Repeat 3 to 5 times. You are removing excess surface starch. If you skip this step the rice will be gluey rather than sticky with distinct grains.
Step 2: Soak for 30 minutes in cold water, then drain completely.
Add your measured cooking water after draining. Use the white rice setting on your cooker, not quick cook. Quick cook rushes the process and the texture suffers.
Step 3: Rest on keep-warm for 10 to 15 minutes after the cycle ends.
Do not open the lid the moment it clicks off. The residual steam finishes the cooking and evens out the moisture throughout the pot. Skipping this step leads to inconsistent texture, dry on top and wet at the bottom.
Seasoning and Folding the Rice
Transfer the cooked rice immediately to a hangiri (a flat wooden sushi bowl) or any wide, shallow mixing bowl. Wood is preferred because it absorbs excess moisture. Metal or plastic bowls trap steam and make the rice wet.
Pour the vinegar seasoning over the hot rice. Then fold, not stir.
- Use a rice paddle (shamoji) held flat
- Cut through the rice vertically, then fold sections over
- Fan the rice while folding to cool it and develop that characteristic glossy finish
- Target temperature before using: around 98 to 100 degrees F (body temperature)
The whole process takes about 5 minutes. The fanning is not optional. It cools the rice quickly and drives off excess moisture, which is part of what gives properly made sushi rice its sheen.
Nobu Matsuhisa, founder of the Nobu restaurant group, has spoken in interviews about the importance of this cooling and folding step. The rice should never be left to cool on its own. Movement and air circulation during the seasoning process are what separate good sushi rice from average sushi rice.
—
Common Mistakes That Ruin Sushi Rice
Most failed attempts at sushi rice come down to the same handful of errors. Worth knowing before you start.
Texture Mistakes
Skipping the rinse is the most common one. Surface starch on unrinsed rice gelatinizes during cooking and creates a paste-like coating on each grain. The result is a gluey clump rather than distinct, sticky grains.
Too much water in the rice cooker comes second. The grains absorb more water than they need, swell past the ideal point, and lose structural integrity. The rice is then too soft to hold its shape in nigiri or rolls.
Seasoning Mistakes
Seasoning cold rice. The vinegar mixture does not absorb into rice that has already cooled. You end up with rice that tastes like plain rice with a puddle of vinegar on top. The rice needs to be hot when the seasoning goes in.
Stirring instead of folding is the other major one. Stirring crushes the grains, releases excess starch, and produces a thick, heavy texture. The cutting-and-folding motion preserves the structure of each individual grain.
Storage Mistakes
Refrigerating sushi rice. This is a hard no.
Cold temperatures cause starch retrogradation: the amylose and amylopectin molecules re-crystallize into a more ordered, harder structure. Research on sushi rice shelf life confirms that refrigerated storage leads to measurable increases in hardness and decreases in the quality expected from fresh-prepared shari (Springer Nature, 2024).
The rice becomes hard, dry, and crumbly. There is no reliable way to restore the original texture. Make sushi rice the same day you plan to use it. That is not negotiable if texture matters to you.
If you are curious about what wine pairs well with the finished sushi, the pairing depends heavily on the toppings. A crisp, dry white works well across most styles. More on that in our guide to wine that goes with sushi.
Sushi itself has a long and interesting backstory that shapes how the rice preparation evolved. The history of sushi goes back centuries, and the role of vinegared rice changed significantly over time from a preservation method to the centerpiece of the dish it is today.
How to Store Sushi Rice and How Long It Lasts
Sushi rice has a short window. Use it the same day you make it, ideally within 4 to 6 hours of preparation.
The vinegar seasoning does lower the pH slightly, which slows bacterial growth compared to plain cooked rice. But it does not make the rice shelf-stable or safe to hold indefinitely (KimEcopak, 2026).
Room Temperature Storage
Cover with a damp cloth. Not plastic wrap, not a tight lid. A damp kitchen towel placed loosely over the bowl allows the rice to breathe while preventing the surface from drying out.
The FDA recommends cooked rice not sit at room temperature for more than 2 hours in normal conditions, or 1 hour if the ambient temperature exceeds 90 degrees F. Sushi rice is subject to the same rules.
- Best use window: within 4 hours of making
- Maximum safe room temperature hold: 2 hours (FDA guideline)
- Do not reheat and re-cool multiple times
Why Refrigeration Damages Sushi Rice
Cold storage ruins the texture. Full stop.
Starch retrogradation begins when cooked rice drops below about 50 degrees F. The amylose and amylopectin molecules reorganize into a harder, more crystalline structure, which is why refrigerated rice feels dry and crumbly rather than sticky and cohesive. Research published in the Journal of Food Measurement and Characterization (Springer Nature, 2024) confirmed that sushi rice stored at 4 degrees C showed significant hardness increases and quality loss within 24 hours.
No reheating method fully restores the original texture. You can microwave refrigerated sushi rice with a damp paper towel over it and it will soften slightly, but the stickiness and structure needed for nigiri or rolls will not come back properly.
If texture matters to you, and it should, make the rice fresh. Plan your portions accordingly.
A Note on Batch Size
Most home cooks make too much sushi rice the first time.
1 cup of dry short-grain rice yields roughly 3 cups of cooked sushi rice. That is enough for 2 to 3 people making rolls at home. Scale up carefully, because any leftover rice will degrade quickly.
| Storage Method | Texture Outcome | Max Time |
| Room Temp + Damp Cloth | Ideal; maintains “al dente” bounce and stickiness. | 4–6 hours |
| Refrigerated (4°C / 40°F) | Poor; starches crystallize, making rice hard and dry. | 24 hours (Safety only) |
| Frozen | Avoid; destroys the grain structure completely. | Not recommended |
Sushi rice stored in the fridge is usable for food safety purposes up to 24 hours, but the eating quality is poor. Only do this if you absolutely have no choice.
If you find yourself with leftover sushi rice that has stiffened slightly but is still same-day, a brief sprinkle of warm water and a gentle fold with the rice paddle can restore enough moisture to work with. Refrigerated day-old rice is a different story.
Planning to serve sushi alongside other Japanese dishes? Check out what goes with it in this guide on what to eat with sushi.
—
Rice Cooker Settings and Model Differences
The global electric rice cooker market reached $4.4 billion in 2024, growing steadily driven by demand for convenient home cooking of rice-based dishes (IMARC Group, 2024). A lot of that growth is coming from home cooks who want consistent results without watching a pot.
The machine you own matters more than most people realize. Two rice cookers using the same ratio and the same rice can produce noticeably different results depending on their technology.
Basic vs. Fuzzy Logic Models
Basic rice cookers use a simple thermostat. They heat until the water is absorbed, then switch to keep-warm. No adjustments, no sensors. Consistent enough for everyday rice, but they require you to handle soaking and steaming manually.
For sushi rice in a basic model, you soak the rice yourself for 30 minutes before adding it to the cooker, and you rest it on keep-warm for 10 to 15 minutes after the cycle ends. The machine will not do either step for you.
Fuzzy logic models (Zojirushi Neuro Fuzzy, Cuckoo) use microprocessor chips to adjust temperature and cooking time based on what they detect inside the pot. According to Zojirushi, their Micom models automatically program soaking and steaming time, which removes two of the steps you have to manage manually with a basic cooker.
Which Setting to Use
White rice setting. That is the right choice for sushi rice on most machines.
Some Zojirushi models include a dedicated sushi/sweet rice setting. Zojirushi’s own documentation confirms this setting balances cooking time and moisture specifically so the rice holds together for nigiri and rolls. If your machine has it, use it.
On basic models without specialty settings:
- Use white rice, not quick cook
- Quick cook skips the proper steam phase
- Results are noticeably worse in texture
Model-Specific Adjustments
Took me a while to figure this out with my own Cuckoo: pressure-based models trap more moisture during cooking than standard electric models. Start with slightly less water than the 1:1 baseline, around 7/8 cup water to 1 cup rice, then adjust from there.
| Model Type | Sushi Setting? | Manual Soaking? | Water Ratio Point |
| Basic / Conventional | No | Yes (30 mins) | 1:1 |
| Zojirushi Neuro Fuzzy | Yes (select models) | Automatic | 1:1 |
| Cuckoo Pressure | Some models | Yes | Slightly under 1:1 |
| Aroma Housewares | No | Yes (30 mins) | 1:1 to 1:1.1 |
In March 2024, Zojirushi introduced a new smart rice cooker line featuring app connectivity and voice control, extending the gap between premium and basic models even further (GM Insights, 2024).
Keep-Warm Function Across Models
Keep-warm is not just a convenience feature. It is part of the cooking process for sushi rice.
The 10 to 15 minutes of keep-warm rest after the cooking cycle ends allows residual steam to redistribute through the rice. Skip it and the top layer will be drier than the bottom. Zojirushi advises against using keep-warm for longer than 12 hours, but for sushi rice that is not a concern since the rice should be used within a few hours regardless.
Your machine is one piece of the equation. Whether you own a $30 Aroma or a $200 Zojirushi, the fundamentals (right rice, right rinse, right soak, correct seasoning) matter more than the brand. A basic cooker with proper technique will beat an expensive machine used carelessly every time.
If you are just getting into making sushi at home, getting the rice right is the single most important skill to develop first. Everything else, the fillings, the rolling, the presentation, depends on having a solid base.
Want to explore the full range of types of sushi rolls you can make once you have the rice technique down? There are more options than most home cooks realize.
FAQ on How To Make Sushi Rice In Rice Cooker
What is the best rice-to-water ratio for sushi rice in a rice cooker?
Use a 1:1 ratio of short-grain Japanese rice to water. Rice cookers trap steam, so you need less water than stovetop methods. Soak the rice for 30 minutes first, drain fully, then add your measured water before cooking.
Do I need to rinse the rice before cooking?
Yes. Rinse until the water runs clear, typically 3 to 5 times. This removes excess surface starch that causes a gluey texture. Skipping this step is one of the most common reasons sushi rice turns out wrong.
Which rice cooker setting should I use for sushi rice?
Use the white rice setting. Avoid quick cook. Some Zojirushi Micom models have a dedicated sushi setting that balances moisture and cooking time specifically for short-grain Japanese rice.
Can I use any short-grain rice for sushi rice?
Stick to Japonica varieties. Koshihikari, Hitomebore, Nishiki, and Calrose all work well. Avoid long-grain varieties like jasmine or basmati. They have the wrong amylopectin content and will not produce the right sticky texture.
How do I make the sushi vinegar seasoning?
For every 2 cups of dry rice, mix 4 tablespoons rice vinegar, 2 tablespoons sugar, and 1 teaspoon salt. Use rice vinegar only. White vinegar is too sharp. Pre-mixed options like Mizkan seasoned rice vinegar also work well.
When do I add the vinegar seasoning to the rice?
Add it immediately after transferring the hot rice to a wide bowl. The rice must be hot for proper absorption. Seasoning cold rice leaves the vinegar sitting on the surface rather than being absorbed into each grain.
How do I cool sushi rice properly after seasoning?
Fold the rice with a flat paddle while fanning it. This cools the rice quickly and produces the characteristic glossy finish. Target a serving temperature of around 98 to 100 degrees F, roughly body temperature, before using.
How long does sushi rice last at room temperature?
Use it within 4 to 6 hours. Cover with a damp cloth, not plastic wrap. The FDA advises against leaving cooked rice at room temperature for more than 2 hours. Make only what you plan to use the same day.
Can I refrigerate leftover sushi rice?
Technically yes, but the texture will suffer. Cold temperatures cause starch retrogradation, making the rice hard and dry. Sushi rice is best made fresh. Refrigerated rice loses the stickiness needed for nigiri and rolls.
Why is my sushi rice too wet or too mushy?
Too much water is almost always the cause. Check that you drained the soaked rice fully before adding measured cooking water. Also confirm you are using the white rice setting, not quick cook, which rushes the process and affects grain texture.
Conclusion
This conclusion is for an article presenting how to make sushi rice in a rice cooker, and the core takeaway is simple: technique matters more than equipment.
Choosing the right Japonica short-grain variety, nailing the rice soaking time, and seasoning with a properly balanced awasezu are what separate decent sushi rice from the real thing.
Whether you are using a basic cooker or a Zojirushi with fuzzy logic, the fundamentals do not change.
Get the vinegar seasoning ratio right, fold instead of stir, fan while cooling, and use the rice the same day.
Do those four things consistently and the sushi rice texture will be there every time.


