

Summarize this article with:
Nothing beats the smoky heat of homemade green chili sauce drizzled over fresh tamales during the holidays. This traditional Mexican sauce transforms simple masa-wrapped bundles into something extraordinary.
Learning how to make green chili sauce for tamales connects you to generations of family recipes passed down through kitchens across New Mexico and Colorado.
The roasted pepper aroma alone will transport you to authentic Mexican cooking.
This guide walks you through selecting the right chili varieties, mastering roasting techniques, and achieving that perfect balance of heat and flavor. You’ll discover why what to serve with tamales matters just as much as the sauce itself.
By the end, you’ll have a foolproof recipe that rivals any abuela’s secret formula. We’ll cover everything from fire-roasting fresh Hatch chilies to storage methods that keep your sauce fresh for weeks.
Selecting the Right Green Chilies

Your sauce quality depends entirely on choosing the right peppers. Skip this step wrong and you’ll end up with bland, watery results.
Fresh Chili Varieties
Hatch green chilies reign supreme for authentic New Mexico flavor. These peppers deliver the perfect balance of heat and smokiness that tamale lovers crave.
Anaheim peppers offer a milder alternative with similar texture. They’re easier to find year-round at most grocery stores.
Poblano peppers bring earthy richness to your sauce. Their thick walls hold up well during the roasting process.
Jalapeños add serious kick for heat seekers. Use sparingly unless your family enjoys wine that goes with chili to cool down.
Canned vs. Fresh Options
Fresh chilies always win for flavor and texture control. You decide exactly how much char and heat goes into each batch.
Canned varieties work when fresh aren’t available. Look for fire-roasted options that skip the bland, mushy texture of regular canned peppers.
Quality matters more than convenience here. Cheap canned chilies taste like wet cardboard and ruin your sauce.
Heat Level Considerations
Test your peppers before committing to a full batch. Heat levels vary wildly even within the same variety.
Mild chilies work best for family meals with kids. Medium heat satisfies most adult palates without overwhelming.
Hot varieties should be used sparingly as accent peppers. One or two jalapeños can transform an entire pot.
Roasting and Preparing Green Chilies

Fire-roasting transforms ordinary peppers into smoky, complex flavor bombs. This step separates authentic sauce from grocery store versions.
Roasting Methods
Open flame roasting delivers the best flavor and char. Hold peppers with tongs directly over gas burner flames.
Turn frequently to char all sides evenly. The skin should blister and blacken completely.
Oven broiling works for larger batches. Place peppers on foil-lined pans 4 inches from broiler element.
Grill roasting adds extra smokiness. Use medium-high heat and watch carefully to prevent burning.
Peeling and Cleaning
Steam roasted peppers in plastic bags for 10 minutes. This loosens the charred skin for easy removal.
Peel skin completely using your fingers or a knife. Charred bits left behind create bitter flavors.
Remove stems and scrape out seeds carefully. Save seeds if you want extra heat in your sauce.
Handle spicy oils safely by wearing gloves. Wash hands thoroughly before touching your face or eyes.
Storage After Roasting
Freeze roasted chilies in portion-sized bags. They keep for six months without losing flavor or texture.
Refrigerate fresh-roasted peppers for up to one week. Use them quickly for best results.
Layer peppers between paper towels to absorb excess moisture. This prevents soggy sauce later.
Essential Ingredients and Equipment

Great green chili sauce requires more than just peppers. These supporting ingredients and tools make the difference between good and exceptional.
Core Sauce Ingredients
Roasted green chilies form your flavor foundation. Everything else builds on this smoky base.
Fresh garlic and white onions create aromatic depth. Sauté them until fragrant before adding chilies.
Kosher salt balances the natural pepper heat. Start with less than you think you need.
Chicken or vegetable broth adds body without masking pepper flavors. Avoid overly salty store-bought versions.
Optional Flavor Additions
Cumin and Mexican oregano bring authentic Southwest character. Use these spices sparingly to avoid overpowering.
Fresh lime juice brightens heavy sauce and cuts through rich tamale masa. Add at the end of cooking.
Tomatoes or tomatillos add subtle acidity. Choose one or the other, never both together.
Bay leaves contribute earthy complexity during simmering. Remove them before serving.
Necessary Kitchen Tools
A high-powered blender creates the smoothest texture. Food processors work but leave more chunks.
Heavy-bottomed saucepans prevent scorching during long simmering. Thin pans burn sauce easily.
Fine mesh strainers remove stubborn skin pieces for silky results. This step separates amateur from professional results.
Airtight storage containers keep sauce fresh longer. Glass jars work better than plastic for acidic sauces.
Step-by-Step Sauce Making Process
Building layers of flavor takes patience and proper technique. Rush this process and you’ll end up with flat, one-dimensional sauce.
Building the Flavor Base
Heat oil in a heavy-bottomed saucepan over medium heat. Sautéing aromatics properly creates the foundation for complex flavors.
Add diced onions first and cook until translucent. This takes about 5 minutes with proper heat control.
Minced garlic goes in next for just 30 seconds. Burned garlic ruins everything, so watch carefully.
Your roasted, peeled chilies join the party now. Let them warm through and release their smoky essence.
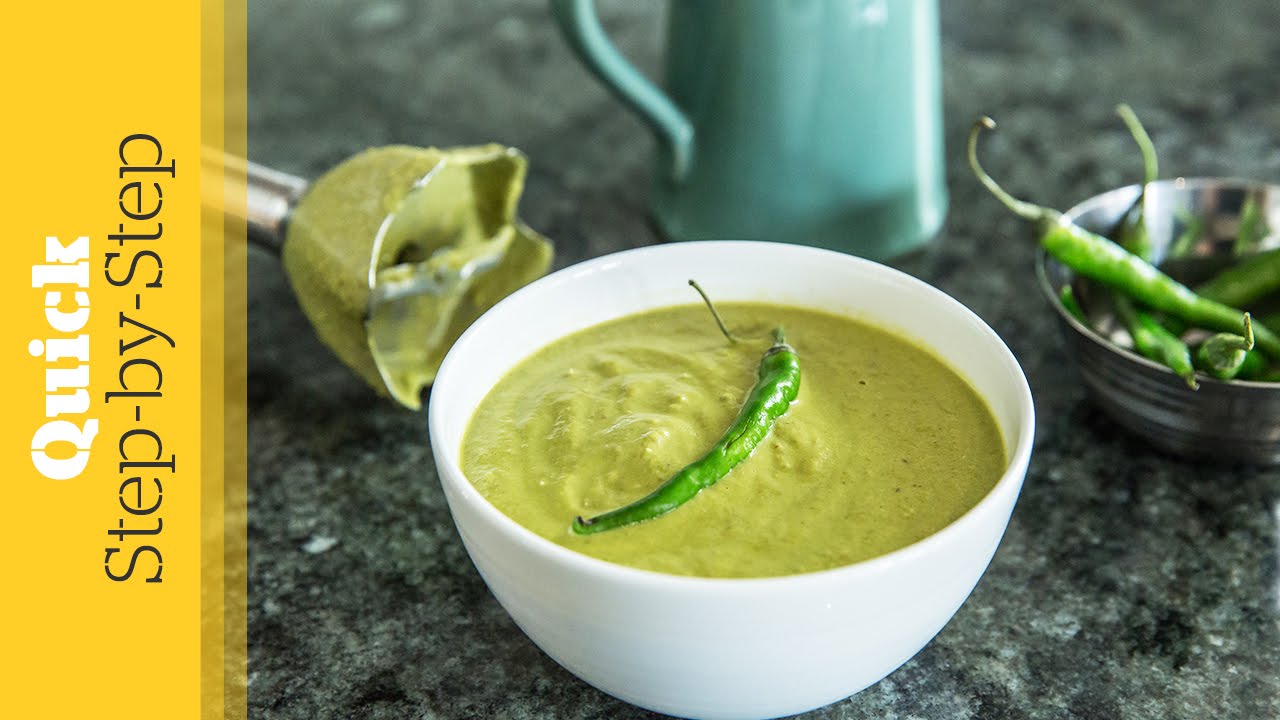
Blending and Consistency
Transfer the mixture to your blender in batches. Never overfill or you’ll create a dangerous mess.
Add just enough broth to get things moving. Too much liquid early on creates watery sauce that’s hard to fix.
Pulse first, then blend on high for 30 seconds. Check texture and adjust as needed.
Some people prefer chunky sauce with visible chili pieces. Others want silky smoothness throughout.
Cooking and Simmering
Return blended mixture to your saucepan over low heat. Gentle simmering prevents scorching and develops flavors.
Stir frequently to prevent sticking. A wooden spoon works better than metal for this job.
Proper simmering temperature shows tiny bubbles around the edges, not aggressive boiling. Too much heat breaks down the pepper structure.
Cook for 15-20 minutes minimum to meld flavors completely. Taste every few minutes to track progress.
Achieving Perfect Texture and Consistency

Texture makes or breaks green chili sauce. Too thin and it slides off tamales, too thick and it becomes paste.
Thickness Control Methods
Reducing through simmering concentrates flavors while thickening naturally. This method takes time but produces superior results.
Remove the lid and let excess moisture evaporate slowly. Stir more frequently as sauce thickens.
Masa harina works perfectly for authentic thickening. Mix with cold water first to prevent lumping.
Cornstarch creates a glossier finish than masa. Use sparingly since it thickens dramatically when heated.
Quick Thickening Tips
- Start with 1 tablespoon masa per cup of sauce
- Always dissolve starch in cold liquid first
- Add slowly while stirring constantly
- Let simmer 5 minutes after adding thickener
Smoothness Techniques
Double blending creates restaurant-quality texture at home. Blend once, cook, then blend again if needed.
Pass sauce through a fine mesh strainer for ultimate smoothness. Press solids through with a spoon.
Remove any stubborn skin pieces by hand. These create unpleasant chewy bits in finished sauce.
Some texture adds character, so don’t over-process into baby food consistency.
Seasoning and Flavor Balance
Great seasoning transforms good sauce into something memorable. This step requires tasting and adjusting constantly.
Salt and Basic Seasoning
Proper salt levels enhance pepper flavors without overwhelming them. Add gradually and taste frequently.
Kosher salt works better than table salt for cooking. It dissolves evenly and tastes cleaner.
Season early but adjust at the end. Flavors concentrate as sauce reduces during cooking.
Under-seasoned sauce tastes flat and disappointing. Over-seasoned sauce can’t be fixed easily.
Heat Level Adjustments
Add more roasted chilies for deeper heat and flavor. Fresh jalapeños create sharp, bright spice.
Cooling down spicy sauce requires dairy or starch, not more liquid. A spoonful of sour cream works wonders.
Sugar balances excessive heat without masking pepper flavors. Use sparingly – just a pinch.
Remember that heat builds as people eat. Start milder than you think necessary.
Heat Management Strategies
- Test sauce when cool – heat perception changes with temperature
- Add spicy elements gradually
- Keep mild base sauce for sensitive palates
- Consider serving hot sauce on the side
Acidity and Brightness
Lime juice cuts through rich tamale masa and brightens heavy flavors. Add this at the very end.
Fresh lime works better than bottled versions. Roll limes before cutting to release more juice.
White vinegar provides acidity without citrus flavor. Use when lime doesn’t fit the flavor profile.
Balance is key – too much acid makes sauce taste sharp and unpleasant.
Storage and Preservation

Proper storage extends your sauce’s life and maintains that fresh-made flavor. Skip these steps and you’ll be making new batches constantly.
Short-term Storage
Refrigerator storage keeps sauce fresh for up to one week. Use airtight glass containers to prevent odor absorption.
Cool sauce completely before refrigerating. Hot sauce creates condensation that waters down flavors.
Portion into smaller containers for daily use. This prevents contaminating your entire batch with dirty spoons.
Label containers with dates to track freshness. Even the best sauce eventually goes bad.
Long-term Preservation
Freezing techniques preserve sauce for up to six months without quality loss. Use freezer-safe containers with tight-fitting lids.
Leave headspace for expansion when freezing. Overfilled containers crack or pop open.
Freeze in meal-sized portions for convenience. Thaw only what you need for each use.
Ice cube trays work perfectly for small portions. Transfer frozen cubes to freezer bags once solid.
Freezing Best Practices
- Cool sauce completely before freezing
- Use within 6 months for best quality
- Thaw in refrigerator overnight
- Never refreeze previously frozen sauce
Reheating and Using Stored Sauce
Best reheating methods restore original texture and flavor. Gentle heat prevents separation and scorching.
Microwave small portions in 30-second intervals. Stir between each heating to distribute warmth evenly.
Stovetop reheating offers better control over temperature. Use low heat and stir frequently.
Add a splash of broth if sauce seems too thick after storage. Consistency changes during refrigeration.
Serving and Pairing with Tamales

Great sauce deserves proper presentation. The right serving style makes tamales feel like a special occasion meal.
Traditional Serving Methods
Ladling over tamales creates the classic presentation everyone expects. Warm sauce slightly before serving.
Serve sauce on the side for picky eaters. Let people control their own heat levels and portions.
Small bowls work better than large serving dishes. This keeps sauce at proper temperature longer.
Provide spoons for easy serving. Forks make sauce distribution messy and uneven.
Complementary Additions
Mexican crema or sour cream balances spicy sauce perfectly. The cool richness tames excessive heat.
Fresh cilantro and diced white onions add bright, crisp contrast. Prepare these just before serving.
Queso fresco or Mexican cheese melts slightly on warm tamales. This creates rich, creamy texture.
Lime wedges let diners add brightness to taste. Fresh citrus cuts through heavy masa flavors.
Perfect Garnish Combinations
- Crema + cilantro + onions for freshness
- Cheese + sauce + lime for richness
- Simple sauce alone for pure chili flavor
- Hot sauce on the side for heat lovers
Other Uses Beyond Tamales
Green chili sauce transforms many dishes beyond traditional Mexican fare. Think of it as a versatile flavor enhancer.
Eggs and breakfast burritos benefit from the smoky heat. Pour over scrambled eggs or inside breakfast wraps.
Grilled meats pair wonderfully with the pepper flavors. Try it on chicken, pork, or beef for Southwest flair.
Wine that goes with enchiladas also complements green chili sauce applications. The acidity works well with both.
Troubleshooting Common Issues
Even experienced cooks face sauce problems. These solutions fix the most common green chili disasters.
Texture Problems
Too thin sauce usually results from excess liquid or insufficient cooking time. Simmer uncovered to reduce moisture.
Remove lid and increase heat slightly. Stir frequently to prevent sticking as sauce thickens.
Add masa harina slurry gradually. Mix thoroughly to prevent lumpy texture.
Never add flour directly to hot sauce. It creates gluey clumps that ruin everything.
Thickening Emergency Fixes
- Simmer uncovered for 10-15 minutes
- Add 1 tablespoon masa mixed with cold water
- Blend in roasted pepper pieces for body
- Remove excess liquid with a ladle
Flavor Imbalances
Too salty sauce happens when you season early and reduce later. Dilute with unsalted broth gradually.
Add diced potatoes and simmer briefly. Remove potatoes after they absorb excess salt.
Lack of heat usually means insufficient chili quantity. Add fresh jalapeños or hot sauce carefully.
Bitter flavors come from charred skin left on peppers. Strain sauce through fine mesh to remove particles.
Color and Appearance Issues
Maintaining green color requires gentle cooking temperatures. High heat breaks down chlorophyll quickly.
Avoid long cooking times that fade bright pepper colors. Fresh lime juice helps preserve vibrant hues.
Brown discoloration indicates overcooking or oxidation. Start fresh if color becomes unappetizing.
Store sauce away from light to prevent color degradation. Dark containers work better than clear glass.
FAQ on How To Make Green Chili Sauce For Tamales
What chilies work best for green chili sauce?
Hatch green chilies are the gold standard for authentic flavor. Anaheim and poblano peppers work well too.
Fresh chilies always beat canned versions for taste and texture. Mix mild and hot varieties to control heat levels.
How do you roast green chilies properly?
Place whole chilies directly over an open flame or under a broiler. Turn frequently until skin blisters and chars completely.
Steam in a plastic bag for 10 minutes, then peel off charred skin easily.
Can you make green chili sauce without roasting?
Roasting creates the signature smoky flavor that defines authentic green chili sauce. Fresh chilies taste flat and grassy without fire-roasting.
Skip this step only if using pre-roasted chilies from the store.
What thickness should green chili sauce be?
Aim for a consistency that coats a spoon but still flows easily. Think between heavy cream and tomato sauce.
Add masa harina or cornstarch slurry to thicken if needed.
How long does homemade green chili sauce last?
Refrigerate up to one week in airtight containers. Freeze for up to six months without losing flavor.
Always cool completely before storing to prevent bacterial growth.
Should you remove seeds from green chilies?
Remove seeds for milder heat levels. Keep them for extra spice and authentic texture.
Taste-test your chilies first since heat varies by pepper and growing conditions.
What spices complement green chili sauce?
Cumin, Mexican oregano, and garlic form the classic flavor base. Salt balances the natural pepper heat.
Lime juice adds brightness that cuts through rich tamale masa.
Can you use frozen green chilies?
Frozen roasted chilies work perfectly for sauce making. They actually break down easier during cooking.
Fresh chilies give slightly better texture but frozen saves time and effort.
How do you fix bitter green chili sauce?
Bitterness usually comes from charred skin left on peppers. Always peel completely after roasting.
Add a pinch of sugar or extra garlic to balance harsh flavors.
What consistency mistakes should you avoid?
Don’t over-blend the sauce into baby food texture. Some chili pieces add character and authentic mouthfeel.
Avoid adding too much liquid at once since you can’t easily remove it.
Conclusion
Mastering how to make green chili sauce for tamales opens doors to authentic Mexican cooking that your family will treasure for generations. This fire-roasted pepper sauce brings Southwest flavors directly to your kitchen table.
Perfect technique starts with selecting quality Anaheim or poblano peppers from your local farmers market. The roasting process can’t be rushed.
Temperature control and proper simmering create that signature smooth consistency every tamale deserves. Remember that masa harina works better than cornstarch for thickening.
Store your finished sauce properly and it becomes a versatile ingredient for enchiladas, eggs, and grilled meats beyond tamales. Batch cooking saves time during busy holiday seasons.
Your first attempt might not match abuela’s recipe, but practice builds confidence. Each batch teaches you more about balancing heat levels and achieving ideal texture.
Soon you’ll be the family member everyone asks to bring the sauce. That’s when you know you’ve truly succeeded.


