

Summarize this article with:
Kirkland Signature chicken drumsticks come in bulk packages at Costco, typically around 8 pounds.
They’re fresh, air-chilled, and sold raw in tear-off pouches.
Most people grab these for weeknight dinners or meal prep because the price per pound is hard to beat.
One package feeds a family of four for multiple meals.
This guide covers three cooking methods: oven baking, air fryer, and grilling.
Cook times range from 20 minutes (air fryer) to 45 minutes (oven).
You’ll need a meat thermometer for all methods.
Product Details
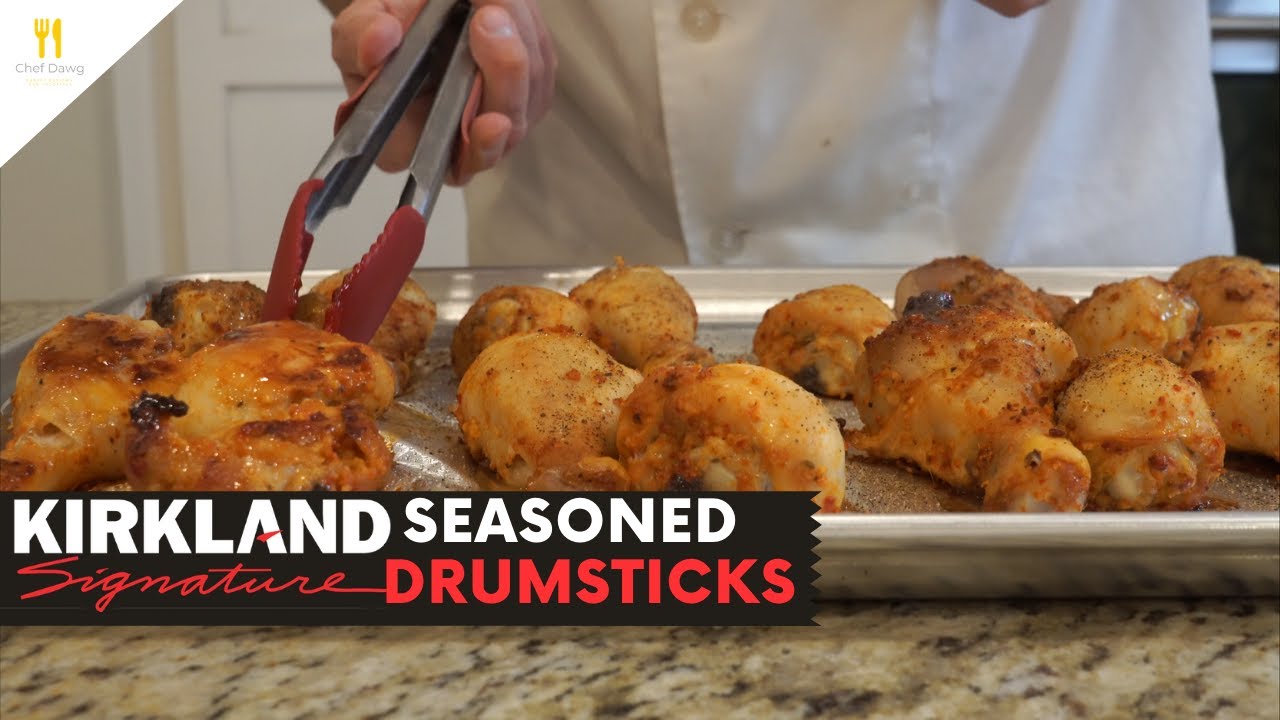
Product: Kirkland Signature Fresh Chicken Drumsticks
Type: Fresh, raw, air-chilled (not pre-cooked)
Package Size: 8 lb average (approximately 16-20 drumsticks)
Price: $0.99/lb at Costco (Updated December 2024)
Storage: Refrigerate at 40F or below; freeze for longer storage
Calories per Drumstick: 118-150 (with skin, medium size)
Main Ingredients: Chicken
Item Number: Varies by location
Cooking Methods Comparison
| Method | Time | Temperature | Result | Best For |
| Oven | 35–45 min | 400°F | Crispy skin, juicy meat | Large batches |
| Air Fryer | 20–25 min | 400°F | Extra crispy skin | Small batches (4–6) |
| Grill | 30–35 min | Medium (450°F) | Smoky, charred flavor | Outdoor cooking |
Recommended Method: Air fryer for crispiest skin in the shortest time
Method 1: Oven Baking (Best for Large Batches)
Oven roasting handles the entire 8-pound package at once.
Takes about 40 minutes at 400F.
Produces golden brown skin and tender bone-in chicken.
Works for 8-20 drumsticks depending on your baking sheet size.
Step 1: How Do You Prepare the Drumsticks?
Pat the chicken legs completely dry with paper towels.
Moisture on the skin prevents crispiness.
Instructions:
- Remove drumsticks from packaging and place on a clean surface
- Use paper towels to absorb all moisture from the skin
- Let them sit at room temperature for 15-20 minutes before cooking
Equipment: Paper towels, baking sheet, wire rack (optional), parchment paper
Step 2: What Temperature and Time Do You Use?
F is the sweet spot.
High enough to crisp the skin, low enough to cook the meat through without burning.
Instructions:
- Preheat oven to 400F
- Season drumsticks with olive oil, garlic powder, paprika, salt, and black pepper
- Arrange in a single layer on a baking sheet (use a wire rack for extra crispiness)
- Bake for 35-45 minutes total
Temperature: 400F
Time: 35-45 minutes
Step 3: When Do You Flip the Chicken?
Flip once at the halfway mark.
This ensures both sides get direct heat exposure.
Instructions:
- At 20 minutes, open the oven and flip each drumstick using tongs
- Check for even browning on the cooked side
- Continue baking for remaining time
Checkpoint: At 20-minute mark
Step 4: How Do You Know When It’s Done?
Use a meat thermometer. Always.
Dark meat like drumsticks tastes best cooked to 175-185F, though 165F is the safe minimum.
Instructions:
- Insert thermometer into the thickest part of the meat, avoiding the bone
- Look for an internal temperature of at least 165F (175F for tender, fall-off-the-bone texture)
- Check that skin is golden brown and crispy
- Let rest 5 minutes before serving
Target Temperature: 165F minimum (175-185F recommended for dark meat)
Visual Indicator: Golden brown, crispy skin with clear juices
Method 2: Air Fryer (Fastest and Crispiest)
The air fryer is where Costco drumsticks really shine.
You get that crispy fried chicken texture without all the oil.
Takes about 22 minutes at 400F.
Handles 4-6 drumsticks per batch.
Step 1: How Do You Prepare the Drumsticks?
Same prep as oven baking, but add a light coating of oil.
Instructions:
- Pat drumsticks completely dry
- Brush or spray lightly with olive oil or avocado oil
- Season with your preferred spices (paprika, garlic powder, onion powder, salt, pepper)
Equipment: Air fryer, tongs, meat thermometer, oil spray
Step 2: What Temperature and Time Do You Use?
F for 20-25 minutes.
Preheating matters here.
Instructions:
- Preheat air fryer to 400F for 3-5 minutes
- Place drumsticks in basket in a single layer (don’t stack them)
- Cook for 20-25 minutes total
Temperature: 400F
Time: 20-25 minutes
Step 3: When Do You Flip?
Flip at the halfway point for even cooking.
Instructions:
- At 10-12 minutes, pause the air fryer
- Flip each drumstick using tongs
- Continue cooking for remaining time
Checkpoint: At 10-12 minute mark
Step 4: How Do You Know When It’s Done?
Check internal temp with a thermometer.
The skin should be deeply golden and crackling.
Instructions:
- Check internal temperature reaches 165F minimum (175F for best results)
- Skin should be golden brown and crispy all over
- If not crispy enough, add 3-5 more minutes
- Rest for 3-5 minutes before eating
Target Temperature: 165F minimum (175F recommended)
Visual Indicator: Deep golden brown, crispy crackling skin
Method 3: Grilling
Grilled drumsticks pick up that smoky flavor you can’t get indoors.
Takes about 30-35 minutes over medium heat.
Works with gas or charcoal.
Great for summer cookouts when you’re already firing up the Weber.
Step 1: How Do You Prepare the Drumsticks?
Bring them to room temperature first.
Cold chicken on a hot grill leads to uneven cooking.
Instructions:
- Remove from refrigerator 30 minutes before grilling
- Pat dry and coat with olive oil
- Season generously (the grill will char off some of it)
Equipment: Grill, tongs, meat thermometer, grill brush, oil for grates
Step 2: What Temperature and Time Do You Use?
Medium heat, around 400-450F surface temperature.
Use a two-zone setup if possible.
Instructions:
- Preheat grill to medium heat (400-450F)
- Clean and oil the grates
- For two-zone grilling: heat one side, leave the other off
- Total cook time: 30-35 minutes
Temperature: Medium heat (400-450F)
Time: 30-35 minutes
Step 3: When Do You Turn?
Turn every 5-7 minutes for even browning.
Instructions:
- Place drumsticks on the grill and close the lid
- Turn every 5-7 minutes to prevent burning
- Move to indirect heat if flare-ups occur
Checkpoint: Every 5-7 minutes
Step 4: How Do You Know When It’s Done?
Grill until you hit 165F internal.
For BBQ sauce, add it in the last 5-10 minutes.
Instructions:
- Check internal temperature reaches 165F (175-185F for tender meat)
- Skin should be charred in spots but not burned
- If adding sauce, brush on during final 5-10 minutes
- Rest 5 minutes before serving
Target Temperature: 165F minimum (185F for fall-off-bone tender)
Visual Indicator: Charred skin with grill marks, no pink at the bone
Safety and Quality Indicators
Food Safety
- Internal Temperature: 165F minimum for all poultry
- Steam Check: Juices should run clear when pierced
- Thawing: Always thaw in the refrigerator, never on the counter
- Raw Handling: Wash hands and surfaces after touching raw chicken
Quality Indicators (Done Properly)
- Color: Golden brown to deep amber skin
- Texture: Crispy skin, tender meat that pulls easily from the bone
- Temperature: Hot throughout, above 165F
- Appearance: No pink meat near the bone
Signs of Overcooking
- Dry, stringy meat texture
- Skin burned black rather than charred
- Meat shrinking significantly from the bone
Serving Suggestions
Portion Size: 2-3 drumsticks per adult serving (approximately 16-20 drumsticks per 8 lb package)
Serving Ideas
- Pair with Costco mashed potatoes for classic comfort food
- Serve alongside Costco frozen vegetables for a complete meal
- Add to a spread with Costco mac and cheese for family dinners
Pairing Recommendations
- Coleslaw, cornbread, baked beans
- Rice dishes like Costco jasmine rice
- Ranch, BBQ sauce, or honey mustard for dipping
Storage and Reheating
Leftover Storage
- Refrigerate within 2 hours of cooking
- Store in airtight container
- Consume within 3-4 days
- Freeze for up to 3 months
Reheating Instructions
- Air Fryer: 350F for 5-7 minutes (best for crispy skin)
- Oven: 350F for 15-20 minutes
- Microwave: 1-2 minutes on medium (skin will be soft)
- Target Temperature: 165F when reheating
Troubleshooting Common Issues
Issue: Skin is rubbery, not crispy
Cause: Too much moisture on the skin before cooking
Solution: Pat completely dry with paper towels. Use a wire rack so air circulates underneath.
Issue: Meat is dry and tough
Cause: Overcooked or temperature was too high
Solution: Use a meat thermometer. Remove at 165-175F and let carryover cooking finish the job.
Issue: Undercooked near the bone
Cause: Drumsticks were too cold when cooking started, or oven wasn’t preheated
Solution: Let chicken sit at room temperature 15-30 minutes before cooking. Always preheat.
Issue: Burnt outside, raw inside
Cause: Temperature too high
Solution: Lower the heat. For grilling, use indirect heat method.
Product Variations and Related Items
Similar Costco Products
- Costco chicken thighs – More fat, slightly longer cook time
- Costco party wings – Smaller, faster cooking
- Costco chicken breast – Leaner, boneless option
Other Costco Proteins
Cooking Time Adjustments
Smaller drumsticks (under 4 oz each) cook 5-10 minutes faster.
Larger drumsticks (over 5 oz) may need 5-10 extra minutes.
Always verify with a thermometer regardless of size.
FAQ on How To Cook Costco Drumsticks
How long do you bake Costco drumsticks at 400 degrees?
Bake Kirkland Signature chicken drumsticks at 400F for 35-45 minutes.
Flip them halfway through.
Larger bone-in chicken pieces take longer. Always check internal temperature with a meat thermometer rather than relying on time alone.
What internal temperature should chicken drumsticks reach?
The safe minimum is 165F.
But here’s the thing. Dark meat like drumsticks tastes better at 175-185F.
The extra heat breaks down connective tissue, making the meat tender and juicy instead of rubbery.
Should you flip drumsticks when baking in the oven?
Yes. Flip once at the halfway mark.
This ensures both sides get direct heat for even browning.
If you’re using a wire rack on your baking sheet, flipping is less critical since air circulates underneath.
How do you get crispy skin on baked chicken drumsticks?
Pat the chicken completely dry before cooking. Moisture is the enemy of crispy skin.
Coat lightly with olive oil. Use high heat (400F or above).
A wire rack helps air circulate for all-around crispiness.
Can you cook Costco drumsticks straight from frozen?
You can, but results suffer.
Add 15-20 extra minutes to cooking time. The skin won’t crisp as well.
For best results, thaw overnight in the refrigerator. Room temperature thawing creates food safety risks.
How many drumsticks come in a Costco package?
A typical 8-pound Kirkland package contains 16-20 drumsticks.
They come in tear-off pouches for easy portioning.
Freeze what you don’t need. The vacuum-sealed packaging works well for freezer storage.
What is the best seasoning for chicken drumsticks?
Keep it simple. Garlic powder, paprika, onion powder, salt, and black pepper work every time.
Smoked paprika adds depth. A touch of cayenne brings heat.
Coat with olive oil first so seasonings stick.
Is air fryer or oven better for cooking drumsticks?
Air fryer produces crispier skin in less time (20-25 minutes versus 40 minutes).
Oven handles larger batches.
For 4-6 drumsticks, use the air fryer. For the whole Costco package, stick with oven roasting.
How long do cooked drumsticks last in the refrigerator?
Store in an airtight container for 3-4 days.
Refrigerate within two hours of cooking.
For longer storage, freeze cooked drumsticks up to 3 months. Reheat to 165F before eating.
Why are my chicken drumsticks rubbery instead of tender?
You probably pulled them too early.
Dark meat needs to hit 175-185F for the collagen to break down properly.
At exactly 165F, drumsticks are safe but often chewy. Cook them a bit longer next time.
Conclusion
Now you know how to cook Costco drumsticks three different ways.
Pick the method that fits your schedule. Air fryer for speed. Oven for bulk chicken cooking. Grill for that smoky char.
These Kirkland drumsticks deliver solid protein at a budget friendly price point.
Keep a meat thermometer handy and aim for 175F for the best texture.
Store leftovers properly and you’ve got easy meal prep sorted for the week.
Simple seasoning, proper temperature, good timing. That’s really all it takes.


